
How to Delete Facebook Account Permanently & Remove Your Data
Quickly delete other unwanted accounts that could be putting you at risk. The more accounts & profiles you have on the web, the greater risk of your information being involved in a data breach. Our free Account Deleter tool helps you find & delete accounts you no longer use.
Deleting your Facebook account is a wise decision if you no longer use it or get value from it. Facebook has been involved in multiple data-related incidents in the past, including a major data breach and the Cambridge Analytica scandal in 2018. Many of us have been on Facebook since the early days of its inception. That means over a decade of information they’ve gathered on you — posts, images, account activity, contact information, user behavior, you name it.
There are many levels to removing your information from Facebook — and the process differs based on your goals. It can be a bit confusing to navigate so we put together this guide to understand your options for removing your data from Facebook.
Let’s jump in.
How to Permanently Delete Facebook Account
This process will delete your account from Facebook’s platform and remove your information entirely from its database.
1. Go to Facebook.com and log in to your account.
2. Click the dropdown menu in the upper-righthand corner and click “Settings & Privacy.”

3. Click “Settings.”

4. Select “Your Facebook Information” from the left-hand navigation.
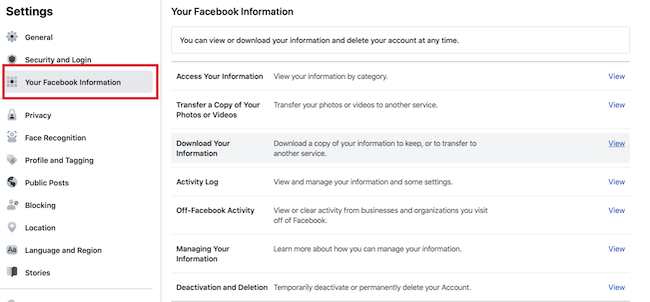
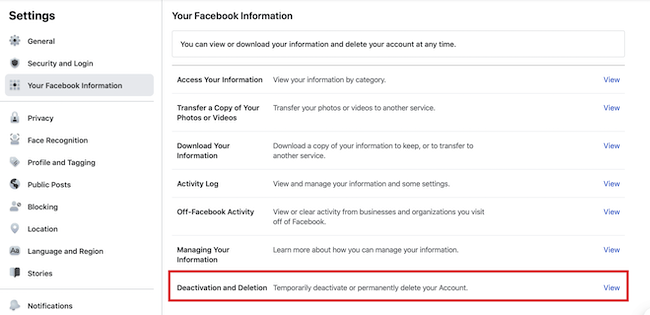
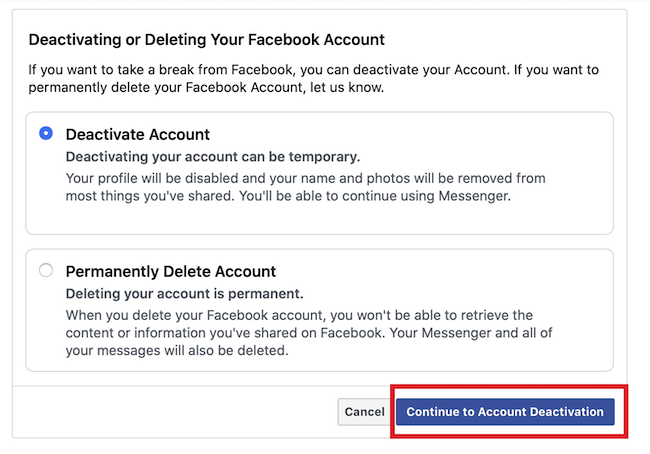
5. Scroll to the bottom of the options & click “Deactivation & Deletion”
6. Ensure “Permanently Delete Account” is selected. Then click “Continue to Account Deletion.”

7. If you wish to continue to use Facebook Messenger, stop here & deactivate your account instead (see below).
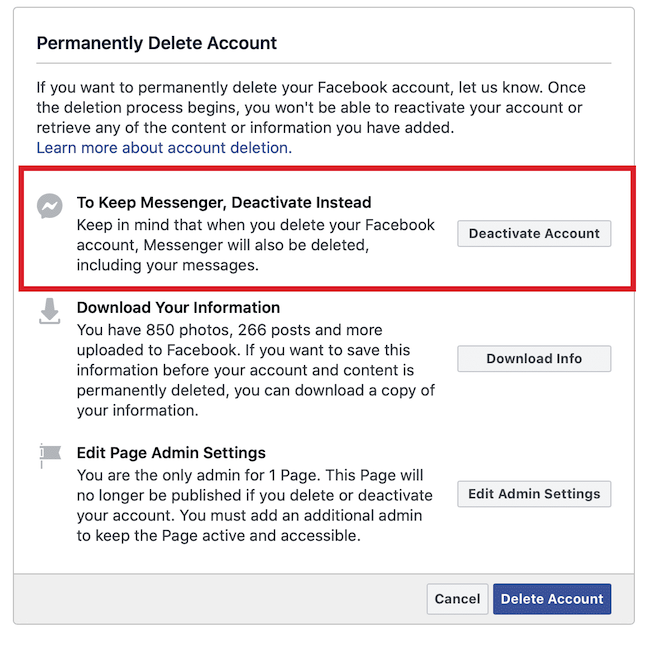
8. Download your information to retain a copy of your photos, posts, etc.
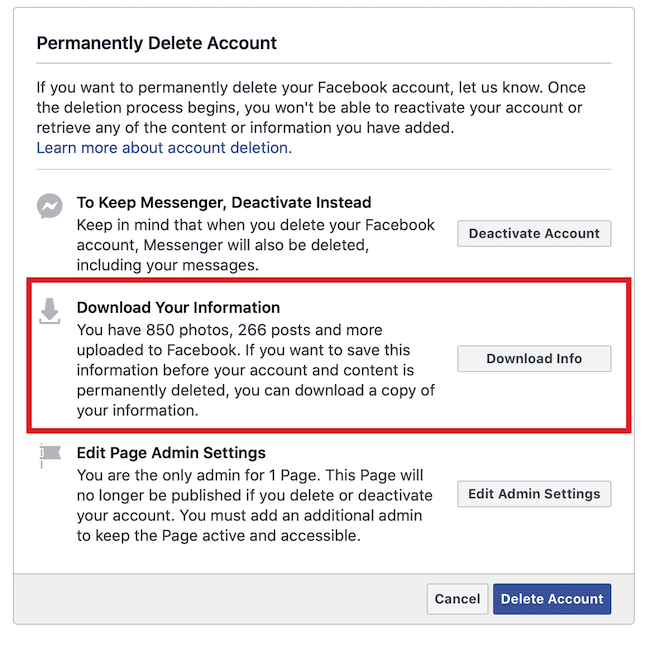
9. Edit Page admin settings (if applicable to you).

10. Enter your password.
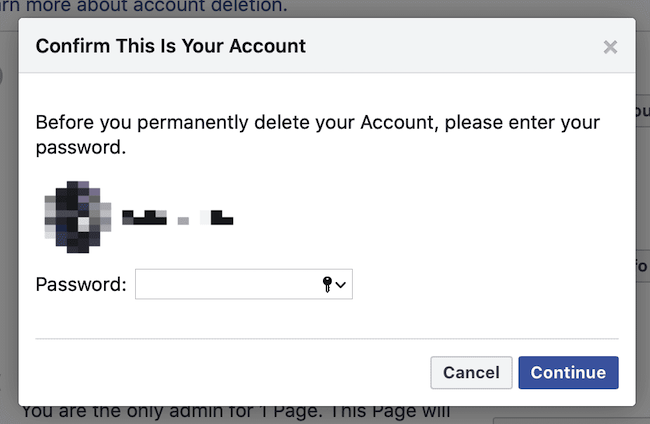
11. Confirm permanent Facebook account deletion.

That completes the account deletion process. A few things to note about deletion:
- Facebook will retain your account for 30 days, after which it will be permanently deleted from their database. You can cancel the deletion process within the 30 day window by logging into your account and reversing the deletion process. After 30 days, your account and information will be irretrievable.
- If you are the sole admin for a Facebook Page that you wish to keep active, then you must provide admin access to another user. Otherwise, the Page will be deleted.
- As we mentioned earlier, deleting your Facebook Account will delete Facebook Messenger, your contacts, and all of your messages. If you wish to keep using Messenger, then go with an account deactivation instead (outlined below).
Deactivate Facebook Account Quickly
If you don’t want to permanently delete your Facebook account, you can temporarily deactivate it. This may make sense if you want to take a break from social media or don’t want your profile viewable anymore to other users.
What does deactivating a Facebook account mean? It disables the profile and removes it from view on the platform. Your name and photos will also be removed from most things that you’ve shared. You will be able to continue to use Facebook Messenger.
1. Log in to your account on Facebook.com.
2. Select “Settings & Privacy” from the dropdown menu in the upper right corner.
3. Go to “Settings.”
4. Click “Your Facebook Information” from the menu.
5. Select “Deactivation & Deletion” from the list of options.
6. Confirm “Deactivate Account” is selected. Then click “Continue to Account Deactivation.”
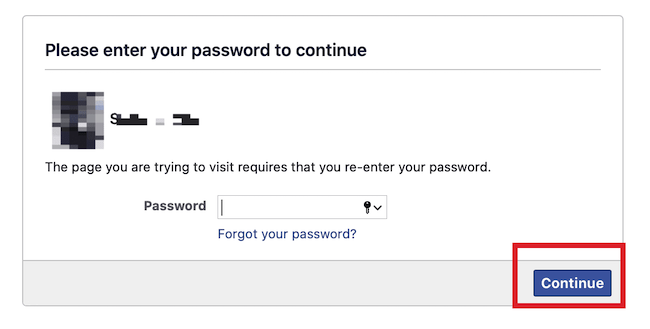
8. Enter your Facebook password to continue.
9. Complete the supplied form, including the deactivation reason, email opt out, and Messenger preferences.
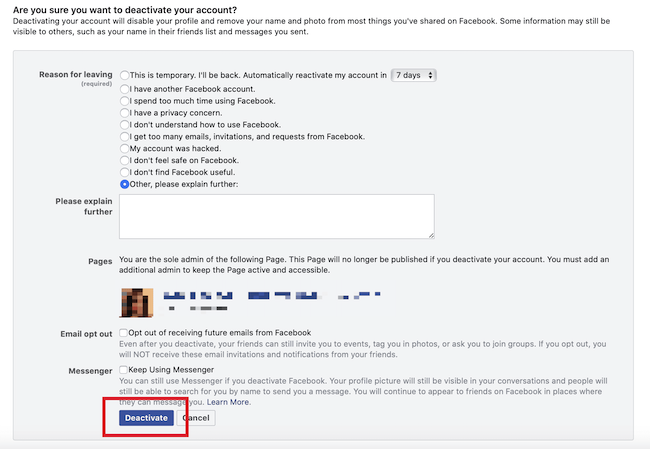
10. Confirm you wish to have your account deactivated.
You can reactivate your account at any time by logging in. A few things to note:
- If you are the sole admin of a Facebook Page, you must add another admin or the Page will no longer be published. You must add another admin to keep the Page active.
- You can designate on the confirmation form how long you wish to have the Facebook account deactivated for. This is useful if you are taking participating in a brief “social media detox” or have a timeframe in mind of when you want to use the account again.
Access & Manage Facebook Data
Facebook provides an easy way to access all of your data. It serves as a running history of everything you’ve done on the platform — you may not be aware just how much data has accumulated over the years. Here’s how to access it.
1. Click on “Access Your Information” in Your Account Settings
You must be logged into your account. This section is specifically located in the “Your Facebook Information” section of Settings as displayed in this screenshot:

2. Navigate the Type of Information Facebook Retains
Click into each data type to get a full picture of what Facebook has.

There are two main groups of data:
Information you’ve shared & uploaded on Facebook
- Your contact information, information in your profile’s ‘About’ section, life events, hobbies, and music
- Posts you’ve shared and been tagged in
- Comments you’ve posted on your own posts and other posts
- Photos or videos you’ve shared or been tagged in
- Friends you are connected with
- Facebook Messenger messages
- Posts, comments, and pages you’ve liked or reacted to
- People, organizations, or businesses you follow
- Groups you belong to
- Your activity on Facebook Marketplace
- Payment History
- Apps and websites you log into using Facebook
- Items you’ve moved to Archive & Trash
Information Associated with Your Facebook Account
- Interactions and existing relationships you have with advertisers and your interactions with businesses and organizations you visit off of Facebook.
- A history of the words, phrases, and names you’ve searched for
- Information related to your location
- Your login history, session length, and other security-related information
- Face Recognition Settings
- Address Book and contact information
- Videos you’ve watched on Facebook
- A history of your voice recording and transcription on Facebook
Get more insight into how Facebook collects, shares, and protects user data in its Privacy Policy.
Download Facebook Data
At any time, you can download a copy of your Facebook information. Many people opt to do this prior to deleting their Facebook account. It may be particularly useful for saving nostalgic items that only exist on Facebook, like photos, videos, and posts between friends.
We’ve already gone through what type of information Facebook has, now let’s jump into how to download copies of it.
1. Select “Download Your Information” in your Account settings.

2. Select which groups of information you wish to download. Click “Create File.”
You can download a complete copy or select specific types of information. You can also select a date range, file format, and media quality for the assets.

3. Wait for your copy of information to be created.
Depending on the size, it may be in multiple files. Facebook will notify you when the file is ready for you to download. You can download it directly from Facebook to your computer.
This is a password-protected process that only you have access to. Once your copy has been created, it will be available for download for only a few days.

How to Delete a Facebook Page
If you no longer have use for a Facebook Page that you manage and it does not make sense to provide admin access to another person, then deletion is your best option. We’ve outlined the steps below.
1. Log into your Facebook account.
2. Click on “Pages” from the navigation on the left side of the screen

3. Select the Page you wish to delete from the list of “Pages You Manage.”

4. In the “Manage Page” menu, select “Settings.”

5. Scroll down and click on “Remove Page.”

6. Confirm Facebook Page deletion.

This will immediately delete your Facebook Page. Unlike with personal accounts that enter a time period where the deletion can be reversed, your Facebook Page cannot be restored.
How to Delete Other Old Accounts
Facebook is likely one of many accounts you’ve signed up for over the years. Deleting these accounts is a critical measure towards lowering your risk of potential data breaches and other hacks. A good rule of thumb: if you don’t use it, delete it. This can be a time-consuming process. We created an easy-to-use tool that quickly identifies accounts you’ve signed up for with a given email address and helps you to delete them.